Hello!  Once again, it’s time for a new challenge at Christmas Card Throwdown.  For the next two weeks, we have a theme that we hope you’ll enjoy:  Nutcrackers or Toy Soldiers.  Since many depictions of nutcrackers around Christmastime feature them as soldiers, we thought we’d combine the two ideas into one theme challenge.

I have two versions of a toy soldier stamp.  It’s the same design, but two different sizes.  The smaller one seemed too diminutive, although I guess if I’d looked hard enough I could have found a good sketch to use it with.  However, I opted to use the larger stamp.  I went way back into the Operation Write Home sketch archives and decided to use sketch #38 since it had a large focal panel.  I had some strippy scraps of designer paper that worked perfectly for the background part of the sketch.  I pulled the colors from the designer paper to color the toy soldier image.  (The green matches better in real life.)  I’ve used some cardstock shims to raise the focal panel up from the background a bit.

52CCT 06-17-2017

What will you do with our theme?  Please show us by linking your own Christmas or wintry card at the CCT site by 7:00 p.m. Eastern time Friday, June 30.  We’d love to see your artwork!  Thanks for stopping by today.

Supplies:
Stamp: Christmas Blueprint (Tim Holtz)
Cardstock: Cherry Cobbler, Kraft, Season of Style designer series paper (Stampin’ Up)
Ink: Early Espresso (SU)
Other: Premier colored pencils (Prismacolor)

Hello! I hope you’re having a great weekend so far.

This week at 52 Christmas Card Throwdown we are celebrating Christmas with a snow people themed challenge!  The design team has made some great cards with various snowman and snowwoman images. You can go to the 52CCT site to see what they’ve created, and if you love what you see, feel welcome to comment on their work – I know they’d really appreciate it!

I don’t have any stamps showing multiple snow people, but I remembered I’d bought a brass embossing stencil many years ago that featured several snowmen.  I dug it out and put it to use for today’s card.  I used some washi tape to hold the stencil in place on a piece of white cardstock, and then held it up to a window to trace the stencil with an embossing stylus.  (I don’t have a lightbox.)  I looked through the archived sketches at Operation Write Home and found one that my embossed panel fit into.  I used some snowman print paper to further tie in with the theme of the challenge.  The vertical strip of paper was originally intended to be a Christmas tree design, but I thought that turned on its side, the trees looked like pennant banners.  I debated whether or not to try to color the embossing, but decided it would be difficult to match colors with my designer papers.  Unfortunately, it wasn’t easy capturing the all the details of the embossed image when I was photographing the card.

52CCT 09-17-2016

I’m going to throw this into the ring at Shopping Our Stash, where they are looking for projects that don’t use stamping.

And now it’s your turn to show us what you can create!  We’d love it if you joined our challenge this week.  You have until 7:00 pm Eastern time Friday, September 23 to link your card at the 52CCT site.  Thanks for stopping by today!  I hope you’ll come back again soon.

Supplies:
Cardstock: Cherry Cobbler, Whisper White (Stampin’ Up); designer paper from Winter Wonderland paper pack (Lizzie Anne Designs)
Other: snowmen brass embossing stencil (Lasting Impressions)

Hello!  It’s theme challenge week at 52 Christmas Card Throwdown, and this time we’re inviting our participants to create cards using the theme of “The Twelve Days of Christmas”.

I puzzled over this for a while, and finally decided to go with the idea of “four calling birds”.  I thought it would be cute to have the birds perched on a set of Christmas lights rather than simply on a tree branch or on an overhead wire.  I stamped the birds and the light bulbs onto scrap white cardstock so that the colors would be more true than if I’d stamped and colored on the sky blue background.  Fussy cutting them took a little while but I think it was worth the effort.  The birds are colored with markers to coordinate with the colors of the lights.  I splattered some shimmery white paint on the focal panel to look like falling snow.  The layout for this card is an old sketch from Operation Write Home, although I changed the focal panel from a rectangle to an oval.

52CCT 07-16-2016

I’m going to link this card to this week’s “Make Your Mark” challenge at Addicted to Stamps and More and to the “Christmas in July 4 Kids” challenge at Send a Smile 4 Kids.

Thanks for stopping by today!  Be sure to see what the rest of the 52CCT design team has done for this challenge, and then link your own card at the challenge site.  You have until 7:00 p.m. Eastern time Friday, July 22 to enter.

Supplies:
Stamps: Winter Sparrows (Lawn Fawn); Holiday Baubles (Sweet ‘n Sassy Stamps)
Cardstock: Sahara Sand, Soft Sky, Real Red (Stampin’ Up); designer papers from Holly Jolly Christmas 6″ x 6″ paper pad (Echo Park)
Ink: Tuxedo Black (Memento); Real Red, Daffodil Delight, Gumball Green (SU)
Other: markers (Copic); Frost White shimmer paint (SU); petite oval Nestabilities die (Spellbinders)

Hello!  Can you believe it’s nearly the end of September already?  In just three months, it will be the day after Christmas!  But if you’ve been joining in our challenges at 52 Christmas Card Throwdown, you should be pretty well prepared with a lot of Christmas cards ready to sign and send.

The fourth Saturday of the month means it’s technique time, and this week we’d like to see your real stitching on a Christmas or wintry card.  Yes, you really do need to break out a needle and thread of some sort this time!  No fair drawing in stitches with a marker or pen!  🙂

For my card, I’ve done a quick and easy counted cross stitch snowflake design in two colors on 11-count Aida cloth.   I took the colors from the cardstock and designer paper I wanted to use.  I found a sketch that would work well with it in the OWH Stars & Stamps sketch archives.  And in a short time, I had a card.

52CCT 09-26-2015

Be sure to check out the fabby cards the rest of the 52CCT design team has made!  Then stitch up a card of your own and link it to the challenge site by 7:00 p.m. Eastern time Friday, October 2.  We’d love to have you join in the fun and creativity!

Supplies:
Stamps: none
Cardstock: Smoky Slate, Soft Sky Prints designer paper (Stampin’ Up)
Ink: none
Other: embroidery floss (DMC); Aida Cloth (Charles Craft)

Hello!  It’s theme challenge week at 52 Christmas Card Throwdown.  This time it should be a fun and easy one:  snowmen.  Feature a snowman (or two or more) on your Christmas or wintry card, and share it with us at the 52CCT site!

I’ve used OWH Stars & Stamps sketch #255 for the layout of my card.  It called for lots of layers, which isn’t my usual style, so it was fun to do something different.  After I stamped and colored the snowman, I added some shimmer paint for the snow on the ground.  It was really hard to get the shimmer to show in the photo.  The white layer of the snowflake embellishment was punched from cardstock that had also been painted with the shimmer paint.

52CCT 07-18-2015

Go to the 52CCT website to see what the rest of the Design Team has made.  Then create your own card and share it with us at the challenge site by 7:00 p.m. Eastern time Friday, July 24.  We’d love to have you join us!

Supplies:
Stamps: Be Jolly (Avery Elle)
Cardstock: Poppy Parade, Gumball Green (Stampin’ Up); Pure Luxury White (Gina K. Designs); designer paper from Nordic Holiday 6″ x 6″ paper pad (Basic Grey)
Ink: Tuxedo Black (Memento)
Other: Frost White shimmer paint, enamel dot (Stampin’ Up); Pierced Oval Stax and Dimensional Banner dies (My Favorite Things); snowflake punches (EK Success); markers (Copic)

finishingstrongbadge

Hello, and welcome to my stop on the Operation Write Home Memorial Day Weekend Blog Hop.  We’re remembering the brave men and women who have given their all for our country and its freedom by sharing cards made for the purpose of sending to our military members stationed overseas so that they may write home to their loved ones. Operation Write Home, a/k/a OWH, is a fantastic charity that has been supporting our military men and women since 2007.  However, because so many of our troops are coming home, OWH will be closing later this year.  All cards to be donated to them need to be sent in by August 1, 2015, so I’m helping to get the word out!

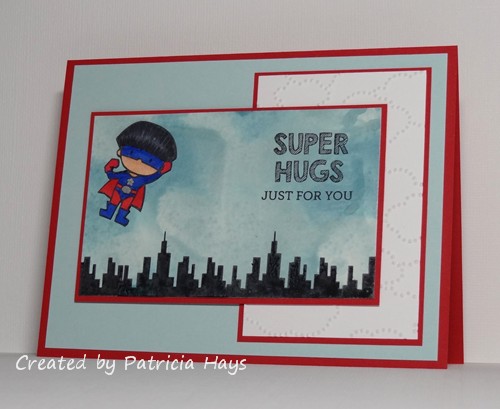
For my card, I knew I wanted to use my little superhero image.  I looked through the OWH Stars & Stamps sketches and found one that I hadn’t yet used – sketch #144.  I ended up flipping it mirror-image because that suited my card design better.  I had a piece of “smashed” cardstock in sky blue tones left over from a cardmaking session last fall (click here to find out how I did it), so I deviated a little from the typical patriotic red, white, and blue for my card.  To make it look more like a sky, I stamped some buildings along the bottom of it, so it would look like the superhero was flying above them.  I stamped the little superhero image on a scrap piece of white cardstock, colored him, and carefully fussy cut him.  Then I glued him onto the sky.  I added a sentiment that makes this card appropriate to give to pretty much anyone, although the image is kind of geared toward kids.  The white panel is dry embossed with clouds, making this card eligible for the current OWH ODBD challenge.

OWH sketch 144

What’s a blog hop without some “blog candy”?  🙂  I have a Priority Mail Flat Rate padded envelope ready and waiting to pack with some crafty goodies.  I’ll send it to one lucky person who comments on this post.  The more comments I receive, the more items will be in the envelope!  I will be reading every comment to ensure that spammers will not qualify for the prize drawing.  Since this is a pretty big blog hop, I’ll give everyone until 12:00 noon Eastern time Friday, May 29, 2015 to leave their comment. The winner will be posted later that day.  Be sure to include your email address when you leave your comment, so I’ll have a way to contact you.

This is my fifth Memorial Day Weekend Blog Hop with OWH, and I’m a little sad that it’s going to be the last one.  However, it’s a good feeling to know that our men and women in service are going to be back home with their loved ones.  I’m glad that I’ve been able to help military families keep in touch, one card at a time, since 2010.

To see the rest of the blog hop participants’ creations, click on the OWH banner at the top of this post.  Thanks for stopping by!  All comments are read and appreciated.  Enjoy the rest of your weekend, and be sure to take some time to remember our heroes who have died in service in order to make our country and world a better place.

Supplies:
Stamps: Super Duo (Mama Elephant for Simon Says Stamp)
Cardstock: Real Red, Soft Sky, Glossy White (Stampin’ Up); Pure Luxury White (Gina K. Designs)
Ink: Tuxedo Black (Memento)
Other: markers (Copic); Soft Sky and Baja Breeze reinkers, Cloudy Day embossing folder (SU); silver paint pen (Zig)

Hello there!  This week is stash challenge week at 52 {Christmas} Card Throwdown.  That means we’re inviting our challenge participants to use particular items from their crafting stash to create a Christmas or wintry card.  I’m the challenge hostess for the month of May, and I’ve chosen ribbon as the stash item.  Most everyone has ribbon, and there are so many different ways to use it, so we’re hoping to see a lot of great cards this week!

I went through the OWH Stars & Stamps sketch challenges to find one that would work well with ribbon, and chose sketch #92, which I hadn’t used yet.  I modified it a bit by using the snowman image in place of the small block shape.  One nice thing about clear photopolymer stamps is that it’s pretty easy to line them up, like I did with the sentiment – the stamp has both words side by side, but I needed to use them one on top of the other to fit the available space.  After I attached my ribbon across the length of the card front, I cut another piece and looped it for a little extra interest.  The snowman is adhered with dimensional adhesive to accommodate the thickness of the ribbon.  It’s still a pretty flat card overall, and the ribbon loop will smush down for mailing.

52CCT 05-23-2015

What will you do with your ribbon?  We’d love to see!  Link your card at the 52CCT site by 7:00 p.m. Eastern time Friday, May 29.  Be sure to check out the rest of the design team members’ cards for more inspiration.  Thanks for stopping by today!

Supplies:
Stamps: Be Jolly (Avery Elle)
Cardstock: Bordering Blue, Naturals White, Cherry Cobbler (Stampin’ Up); designer paper from Winter Wonderland paper pack (Lizzie Anne Designs)
Ink: Tuxedo Black (Memento)
Other: Be Jolly die (Avery Elle); ribbon (Offray); dimensionals (SU)

Hello!  It’s the third Monday of the month, which means it’s time for a new challenge at Cards in Envy.  For the next two weeks, we’re focusing on creating cards for the guys in our lives.  Your card can be for a young boy, a young adult, or an older gentleman – so long as it’s A2 sized, doesn’t have lumpy, bumpy embellishments, and can be mailed at the regular first class postage rate.

I have to confess that I wasn’t feeling very creative when I was trying to make my sample card for this challenge, so I decided to browse through the sketch library on the OWH Stars & Stamps blog.  I found an older one that looked like it would work well with designer papers.  So I chose it and let the designer papers do most of the creative work for me.  Once I chose the papers, it was pretty simple to put it all together.  The dew drop embellishments are a little thicker than what I normally use on cards, but because they are less than 1/4″ thick they still fit the CIE challenge requirements.

CIE 05-18-2015

We hope you’ll have fun with this challenge and share your masculine card with us at Cards in Envy!  Link your card to our challenge post by 7:00 p.m. Eastern time Sunday, May 31.  Happy crafting!

Supplies:
Stamps: Birthday Greetings (Gina K. Designs)
Cardstock: Soft Sky, Blue Bayou (Stampin’ Up); designer papers from Marjolaine 6″ x 6″ paper pad (Basic Grey)
Ink: Early Espresso (SU)
Other: corner rounder punch (EK Success); dew drops (Robin’s Nest)

Hello!  It’s color challenge week at 52 Christmas Card Throwdown!  Since I’m the challenge hostess this month, I picked the color scheme this time, and it’s a bit nontraditional:  the pastel colors of soft pink, pale yellow, and light green.  I’ve based it off of a card I made for 52CCT a few years ago – click here to see it.

Once again, I used a sketch from the OWH Stars & Stamps blog for the layout of my card.  I’ve kept the tree idea from my earlier card and used the same colors of cardstock.  I used my glitter pen to add a tiny bit of sparkle to the star, but it doesn’t show well in the photo.  The ornaments on the tree are three different colors of self-adhesive pearls – pink, yellow, and ivory.  This card is being added to the stockpile I’m creating to send to Operation Write Home in the fall.

52CCT 05-09-2015

Now it’s your turn to show us what you can make with these colors!  If you need more inspiration first, go visit the 52CCT site and see what the rest of the design team has created.  Be sure to link your card at the 52CCT site by 7:00 p.m. Eastern time on Friday, May 15.  We look forward to having you join us!

Supplies are from Stampin’ Up unless otherwise noted:
Stamps: Season of Joy, Endless Wishes
Cardstock: Barely Banana, Blushing Bride, Very Vanilla, Certainly Celery Prints designer paper
Ink: Certainly Celery, Barely Banana
Other: petite oval and petite scalloped oval Nestabilities dies (Spellbinders); Stitched Scalloped Border die (Lawn Fawn); pearls (KaiserCraft); Wink of Stella pen (Zig)

Hello, and happy Monday!  It’s time for a new challenge at Cards in Envy.  For the next couple of weeks, we have a challenge theme of “When Nature Calls”.  Your card should feature something found in nature.  Remember to make it A2 size (4.25″ x 5.5″) and thin enough to fit in an envelope.

I pulled out a lot of retired supplies for my card – the stamps, the multicolored ink pad, and the red and mustard cardstocks.  I made the focal panel by liberally spritzing water onto a piece of natural cardstock, inking up the leaf stamps with the multicolored ink pad, and stamping onto the wet cardstock, which caused the dye ink to run and blur.  After the cardstock dried, I stamped the leaves again, providing the detailed veining in them.  The layout of my card is OWH Stars & Stamps sketch #253.  I’m also going to enter this card into the current Retro Rubber “Anything Goes” challenge.

CIE 05-04-2015

sketch 253

Now it’s your turn!  Show us your own card depicting something found in nature by linking it to the Cards in Envy challenge post by 7:00 p.m. Eastern time Sunday, May 17.  We’d love to see what you create!  Thanks for stopping by today.

All supplies for this card are from Stampin’ Up unless otherwise noted:
Stamps: Autumn, Always On My Mind
Cardstock: Ruby Red, More Mustard, Naturals Ivory
Ink: Pumpkin Patch Spectrum pad
Other: standard circle Nestabilities dies (Spellbinders)

OK, I have to admit this isn’t one of my most favorite cards I’ve ever made.  It’s one that came together very quickly for me, combining OWH Stars & Stamps sketch #251 with the current Less is More challenge to use black as a dominant color.  One of the Less is More co-creators, Chrissie, has been a frequent supporter of the CAS Colours & Sketches challenge blog and I’d like to reciprocate the favor.  Hopefully in the coming weeks I’ll be able to do that!

LIM218

I’ve used washi tape to create the vertical stripes.  Here’s the sketch diagram:

sketch 251

As luck would have it, this happened when I was trying to photograph the card:

LIM218 Lyric

I guess he felt he needed to be in the photo too since the LIM challenge was “predominantly black”. Silly kitty.

Thanks for stopping by today!  Comments are always read and appreciated.  🙂

Supplies:
Stamps: Incredible (Technique Tuesday)
Cardstock: Basic Black, Whisper White (Stampin’ Up)
Ink: Tuxedo Black (Memento)
Other: washi tape (We R Memory Keepers)

If you’ve been reading my blog for any length of time, you’ve probably figured out that I seriously love the adorable animal stamps from Lawn Fawn.  Each year to commemorate the company’s birthday, they put out a new little celebratory set.  As soon as I saw this year’s set, I knew I had to have it – not just for myself, but also for a dear friend of mine.  I preordered it from one of my favorite online stores, and waited patiently, and finally received the stamps a few weeks ago – one set for my friend, and one for me.

Then I had the dilemma of when the best time to give my friend her set would be.  Her birthday isn’t until September, and I didn’t think I could wait that long.  So I did a little calendar math and reasoned that since March and September are six months apart, I’d send it to her for her half-birthday.  I thought that a half-birthday gift would be a much more unexpected surprise than a birthday gift, and that just seemed like a really fun thing to do.

So I sent my friend’s set to her recently, tucked inside of the card I’m sharing here today.  I used a wash of distress ink on watercolor paper to create some variegated blue paper and then cut it with dies, using the darkest blues for the waves and the lightest blues for the sky.  I toyed with the idea of coloring the otter with distress inks too, but I haven’t done any detail painting like that for a while, so I decided to play it safe and color the otter with markers instead.  Once he was colored, I fussy cut him so I could place him floating among the waves.  The sentiment stamp actually reads “have an otterly great birthday”, but that didn’t seem exactly right for this particular purpose.  So I inked it selectively and fit the wording into the space available, using my trusty Stamp-a-ma-jig to line it up neatly.  I used OWH Stars & Stamps sketch #184 for the layout of the card.  Hopefully I’ve used enough distress ink for the card to count toward the current Lawnscaping challenge, too.

102 - distressed otter

I hope my friend enjoys using this stamp set as much as I enjoyed making this card for her!  She’s an “otterrific” lady and I hope she realizes how much our circle of friends loves her.  Thanks for stopping by today!

Supplies:
Stamps: Year Five (Lawn Fawn)
Cardstock: Marina Mist, Kraft (Stampin’ Up); watercolor paper (Artist’s Loft); designer paper from Nature’s Whisper paper pack (Creative Memories)
Ink: Tuxedo Black (Memento); Faded Jeans Distress Ink (Tim Holtz)
Other: markers (Copic); stitched circle Stackables die (Lawn Fawn); Landscape Trio die (Mama Elephant)

Hello!  Since it’s the third Monday of the month, it’s time for another challenge at Cards in Envy.  Our theme for the next few weeks is “Spring is in the Air”.  Let anything related to the season of Spring inspire your creativity when you make a card for this challenge – flowers, colors, animals, whatever seems like Spring to you!  Remember that for our challenges, all cards must be A2 sized and cannot have lumpy, bumpy embellishments more than 1/4″ thick.

One of my favorite things about Spring is that flowers start blooming.  Even though we’ve had a lot of cold, snowy weather over the last month, the daffodils in my flower border are starting to put out foliage.  In anticipation of them showing their sunshiny-yellow blossoms, I’ve used a daffodil stamp for my card and colored it in representation of the daffodils that grew in my family’s yard when I was growing up.  The layout is OWH Stars & Stamps sketch #B-17 – a bonus sketch from a 2012 blog hop.  I’ve turned the sketch on its side and stamped the sentiment directly onto the main panel of the card rather than making a small panel especially for it.  The vertical strip of designer paper is some pretty old stuff, and the green cardstock is a retired Stampin’ Up color, so I’m continuing on my personal goal of actually using up some of my older stamping supplies.

CIE 03-16-2015

Be sure to check out what the rest of the Cards in Envy design team has made!  How will the changing season inspire you?  We’d love to see your creativity!  Share your card using the linky tool at the Cards in Envy site by 7:00 p.m. Eastern time Sunday, April 5.

Supplies:
Stamps: Three Daffodils (Hero Arts); Always in My Thoughts (Stampin’ Up)
Cardstock: Certainly Celery, So Saffron, Petals & Paisleys designer series paper (SU); Pure Luxury White (Gina K. Designs)
Ink: Tuxedo Black (Memento)
Other: markers (Copics)

Well hello!  It’s time for another fun challenge at Cards in Envy.  For the next two weeks, we’re “Going Gray” with a winter-inspired color scheme.  Cards made for this challenge should use gray as the dominant color, as well as be A2 sized with no lumpy, bumpy embellishments.

After a lot of thought, I decided I’d use one of my animal stamps and have a gray animal on my card for this challenge.  I originally thought about using a rabbit – but then that made me think of gray hares, which was too much like gray hairs, which I’d rather not think about!  LOL!  I finally settled on this mouse image.  The stamp set that it’s from also has several star images.  I was browsing online looking for a good card sketch to use for the layout of my card, and felt that the most recent OWH sketch might work.  To me, the square element resembled a window, and I could position the mouse so it would be sitting on the windowsill, looking out at the stars.  I die cut a couple of stars to use in place of the round embellishments on the sketch, but opted to use just one to make the scene more realistic.  I covered the star with Stickles to give it some sparkle, but then painted over it with white shimmer paint to make sure the glitter wouldn’t flake off.  The paint covered the glitter more opaquely than I realized it would, but the texture of the glitter still shows.  I chose a grayish blue for my sky color and flicked some shimmer paint onto it for distant stars.  Fussy cutting around the mouse’s tail and whiskers was a little nerve wracking, but in the end, I think it was worth the effort.  Because the mouse stamp has him facing to the right, I flipped the sketch mirror-image so the mouse could be looking at the shiny star.  It’s been a while since I’ve made a “missing you” themed card for OWH so that was the driving force behind the sentiment I chose.  The card turned out quite clean and simple in style, and I have to say that I’m pretty pleased with it.  🙂

CIE 01-19-2015

OWH Sketch 246

Thanks for stopping by today!  What kind of card will the color gray inspire you to create?  Be sure to check out what the rest of the Cards in Envy design team has made.  Then share your own work with us by 7:00 p.m. Eastern time Sunday, February 1.  We’d love to have you join in the fun and creativity!

Supplies:
Stamps: Storybook, Handwritten Notes (Avery Elle)
Cardstock: Smoky Slate, Basic Gray, Buckaroo Blue (Stampin’ Up); Pure Luxury White (Gina K. Designs)
Ink: Tuxedo Black (Memento)
Other: markers (Copic); Frost White shimmer paint (SU); Storybook dies (AE); Star Dust Stickles (Ranger)

Hello there!  It’s the first Monday of the month, which means it’s time for a new challenge at Cards in Envy.  We’re kicking off 2015 with a challenge called “Make it a Banner Year!”  We’d like to see you use at least one banner on the card you create for this challenge.  Remember that for our challenges, all cards must be A2 sized (4.25″ x 5.5″) and cannot have lumpy, bumpy embellishments more than 1/4″ thick.

OWH Stars & Stamps sketch #226 was perfect for this challenge!  I’ve turned the sketch 90° on its side.  It seems like at the beginning of each year, I think to myself, “OK, this year I’m finally going to use up some of my older supplies”… and then I get distracted by new materials and never quite seem to completely use up the older things.  This year I’m starting off on that trend with some older designer paper, which I used for the background panel of my card.  The turquoise banner is also from the same 6″ x 6” pad.  I pulled two colors from the floral paper for my solid color cardstocks, and white for my sentiment panel.   The sentiment panel covered up a fair amount of the turquoise in the floral paper, so I added some enamel dots to help bring out that color.  The “Happy” and “to you” words in the sentiment are actually in an outline font; I’ve colored them in to make them a little bolder.

CIE 01-05-2015

What type of banners will you use on your card?  Visit the Cards in Envy site to check out what the rest of the design team has made.  Then link your own card there by 7:00 p.m. Eastern time Sunday, January 18.  We’d love to have you join in the fun!  Thanks for stopping by today.

Supplies:
Stamps: Cake & Candles (Avery Elle)
Cardstock: Pumpkin Pie, Poppy Parade, Whisper White (Stampin’ Up); designer papers from Gypsy 6″ x 6″ paper pad (Basic Grey)
Ink: Poppy Parade (SU)
Other: Pumpkin Pie marker, enamel dots (SU)

© 2019 Suffusion theme by Sayontan Sinha