Hello!  I realize it seems strange to be talking about Christmas on the day before Easter, but really, is it wrong to be in the Christmas spirit of giving and love all year round?  I think not.

Since it’s the fifth Saturday of the month, this week’s theme at 52 {Christmas} Card Throwdown is “Anything BUT a Card, ATC or Tag Goes”.  This is your chance to create a 3-D project that can be used as a Christmas decoration or a Christmas gift.  Share it over on the 52 {Christmas} Card Throwdown site by 1:00 pm eastern time Friday, April 5.

I have to admit that I tend to have a difficult time coming up with ideas for 3-D projects.  I’m so much more of a card maker than a project maker (does that make sense?).  I finally decided to try my hand at making a Christmas ornament.  Well, more like decorating a Christmas ornament.  I’d bought some glass ornaments on clearance at Michael’s after Christmas several years ago and tucked them away, thinking I’d do something with them, but never really knowing exactly what.  So I figured this was as good a time as any to try to work something out with them.  I browsed the internet looking for ideas.  This one seemed easy enough so I thought I’d give it a go.  Stuffing an ornament with strips of paper didn’t seem too difficult.

I originally thought I’d use designer paper for the strips of paper.  But I couldn’t decide which designer paper I wanted to use.  In searching around, I rediscovered this red and green paper that I’d bought years ago.  It’s actually copy paper weight, not cardstock nor designer paper.  But I figured I’d try out this ornament project with it.  I do think using the lightweight paper was a better idea than using designer paper would have been.  Because it’s thinner, it bends more easily to slip inside the ornament than designer paper would.  However, there were two small problems I encountered.  I knew I had to keep the strips pretty narrow so they’d fit inside the ornament, but I had no idea what length to make them.  I settled on 5.5″ long since that’s half the length of the sheet of paper.  For the size of this ornament (approximately 2″ tall), that turned out to be a good length.  The other problem was the shape of the ornament.  Mine is a cube shape.  I think the strips would have stayed against the side of the ornament better with a round ornament, like the directions show.  But I guess mine turned out all right.


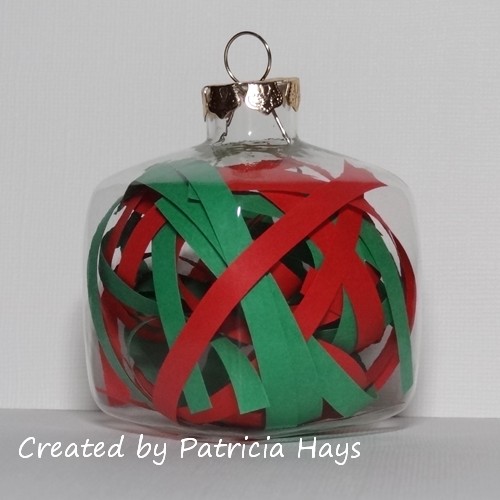
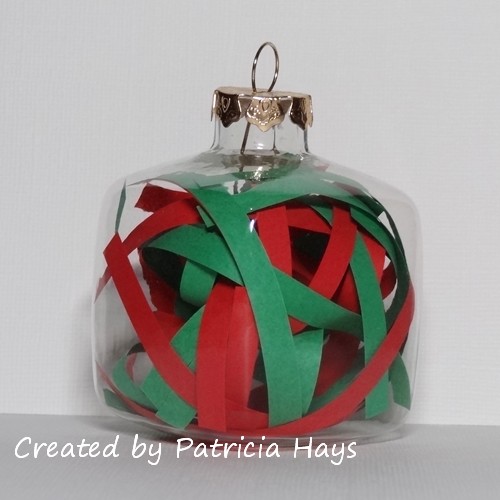
I didn’t count how many strips of paper I used, but it was an equal number of red and green.  I just stuffed them in there until the ornament looked pretty full.  Some of them started bunching up inside instead of molding to the sides of the ornament.  But I like that the ornament isn’t solidly covered with the strips.  This way some of the lights from the tree may be able to shine through.

I debated adding a ribbon bow to the top of the ornament.  I decided against it because I couldn’t decide whether white or ivory would look better, and mainly because I stink at tying bows so that they look pretty.

So anyway, there it is.  Now it’s your turn to visit the rest of the design teams’ blogs and see what fantastic “anything but a card” things they have made.  Then share your own project with us – we’d love to see what you create!

Supplies:
Glass ornament: Michael’s
Paper: Array

Hello! Happy Friday! I hope all my American readers had a wonderful Thanksgiving yesterday. My family is spending the holiday with my husband’s family. We don’t see them often, so we’re all trying to enjoy our time together as much as we can.

Since it’s Friday, that means it’s time for a new Sweet ‘n Sassy Digi Challenge! This week our challenge is Gifts. Use a digital image to create a gift, or simply use a digital image depicting a gift. You don’t have to use a Sweet ‘n Sassy digital image, but we do enjoy seeing our participants use them (and you get the chance for extra perks if you do – see the Digi Challenge site for more details!). Link your card at the Sweet ‘n Sassy Digi Challenge site by midnight eastern time Thursday, November 29.

I wanted to make a holder for a gift card.  A few weeks ago I saw this one that looks like a gift box and decided to give it a try.  I made a few modifications to it – one, I kept the top of the “box” separate instead of hinging it to the bottom with a brad ; two,  I simplified the “bow” on the top of the box.  I printed the Cookie Mouse image several times so I could paper piece her bow and her present to match the gift card holder, and so I could pop up her head and paw so it looks like she’s really peeking around the present.  So, first I’ll show a photo of all the components:

This one shows how the insert slips inside the “bottom of the box”:

Here’s another view, showing the gift card:

And finally, here it is, all put together:

This turned out just a bit too tall to fit in an A2 envelope (for example, if you wanted to mail this to someone).  If I’d made the box shorter and wide enough so the gift card insert would go into it horizontally instead of vertically, it would work.

Thanks for stopping by today!  Be sure to see what the rest of the Design Team has created and give them some comment love.  Links to their blogs are in the left sidebar.  Then join us in our challenge this week!

Supplies:
Digital Images: Cookie’s Gift, Christmas Sentiments (Sweet ‘n Sassy Stamps)
Cardstock: Pure Luxury Ivory (Gina K. Designs); Fruitcake Plaid designer paper from Fruitcake collection (Basic Grey)
Ink: printer ink
Other: markers (Copic); 5-petal Flower punch, dimensionals (Stampin’ Up); iTunes gift card

Hello! Happy Friday! Are you ready for another Sweet ‘n Sassy Digi Challenge?

This week’s challenge is to create Anything But a Card using a digital image. There are loads of possibilities here! Just to offer a few examples, you can make a gift bag or gift box, or alter a clipboard or a tin or a notebook, or create a scrapbook page, a bookmark or a magnet. So long as you use at least one digital image for the focal point of your project, anything goes! You’re not required to use a Sweet ‘n Sassy digital image, but we do love it when our participants use them (and you get the chance for extra perks if you do – see the Digi Challenge site for more details!).

I decided to try making a mini calendar because I thought if it goes together easily enough, it would be fun to make these as Christmas gifts. Calendar templates can be found pretty easily online; I got mine from the templates forum at Splitcoaststampers.com and then tweaked it to suit my style and to fit an entire year’s worth of calendar months on one page. I figured I’d start off with January, and I thought that one of Sweet ‘n Sassy’s Cocoa Mouse images would be good because there are more than enough Cocoa images to pick one for each month of the year. A lot of people appreciate a hot drink on a cold January day, and so does Cocoa. He’s snuggled up to the cup here to keep warm! I paper pieced the mug sleeve from designer paper that coordinated with the background paper I chose, and the rest of the image was colored with Copic markers.  I slipped this into an old acrylic photo frame that I had here; this allows the calendar to stand on its own on a desk or other horizontal surface.  I can’t remember if I bought the frame at Walmart or Dollar General, but it was really inexpensive.


So, now it’s your turn to make Anything But a Card! Link your project at the Sweet ‘n Sassy Digi Challenge site by midnight eastern time Thursday, November 8. Remember that for every project you submit throughout November, you will get one entry to be eligible for winning 3 digital images of your choice from the Sweet ‘n Sassy Stamps store! Be sure to play along every week, and to go visit the rest of the design teams’ blogs for more inspiration. Thanks for stopping by today!

Supplies:
Digital Image: Cocoa’s Latte (Sweet ‘n Sassy Stamps)
Cardstock: Basics White (Papertrey Ink); designer papers from Holly Jolly Christmas 6″ x 6″ paper pad (Echo Park)
Ink: printer ink
Other: markers (Copic); acrylic photo frame (source unknown); corner rounder punch (EK Success)

Hello!  Today I’ll be sharing the last of the Valentine-type projects I’ve made this year.  If you’re looking for the Virtual Valentine’s Day Blog Hop, you’ll want to click here: BLOG HOP post

Being on the InStyle Stamps design team has given me the chance recently to work with some really neat products from Plaid.  I received an assortment of Mod Podge glues, two colors of Extreme Glitter, Pop Dots and Mini Pop Dots.  Because I was feeling under the weather when I was working on these projects I didn’t get too adventuresome with the products, but hopefully soon I’ll be able to play with them some more.

Before I show you my projects, I want to talk about the Extreme Glitter.  I have to admit that for years I’ve stayed as far away from glitter as humanly possible.  I really despise the way it gets all over the place and sticks to everything and flakes off your project and you can’t get rid of it.  Well, Extreme Glitter is very different. It’s like a cross between a glue and a paint with lots of glitter mixed into it.  You simply brush it onto your project with a paint brush and let it dry. When I was just playing with the Extreme Glitter to try it out, I painted a reasonably thick (about 1/16″) coat of it on a scrap piece of cardstock. I gave it about an hour to dry, per the directions on the bottle.  Then I took my glittered scrap of cardstock and I rubbed my fingers over the glitter.  And I bent the cardstock.  And I cut into the painted part.   And the glitter seriously DID NOT FLAKE OFF!!!  I am SO impressed by that!  I thought, “WOW – this gives Operation Write Home cardmakers a way to use glitter safely on their cards!” (Glitter that flakes off onto our heroes’ clothing can be detected by night vision equipment, putting them at higher risk of danger – so glitter is generally a big no-no on OWH cards.)  I never thought I’d like glitter, but Extreme Glitter is helping me see it in a whole new light.

So now, here’s the card I made.  Because I plan to donate it to Operation Write Home and their Valentine’s Day deadline is long past, I wanted to keep it a kind of generic “love” theme.  The layout for the card is this month’s InStyle Stamps sketch challenge.  I used the InStyle Stamps Kissing Birds image.  Isn’t it adorable?  After I colored the birds with Copic markers, I painted their wings with red Extreme Glitter.  (I love that the wings are heart shaped.  TOO CUTE!) I added some designer papers from Basic Grey’s Sugar Rush 6″ x 6″ paper pad and a sentiment from Lizzie Anne Designs’ stamp set So Much Love.  The circle and scalloped circle were cut with Nestabilities dies and attached to the card with mini Pop Dots. I didn’t have a very good photography day so I don’t know how well you’ll be able to see the glitter in the photo.

Next… Several months ago, I found an 8″ x 6″ rectangular tin on clearance at Michael’s for only $1.99 (the original price was something like $7.99).   I knew I’d be able to decorate it and put it to use some day – and the Plaid products gave me the opportunity to do it.  I decided to make it a kind of a treasure box to put special things in, like the birthday cards my sons give me.  I chose some papers from Basic Grey’s Blush collection, cut them to the size needed to cover the sides and top of the tin, and used Matte Mod Podge to adhere the papers to the tin.  Mom Love, one of InStyle Stamps’ newest digital images, is gracing the top of the tin.  She’s on a Nestabilities Labels Eight die cut.  I colored much of her with Copic markers, but decided to paper piece her dress and hair bow with another paper from the BG Blush collection.  Her string of hearts is also paper pieced from one of the Blush papers.  The paper for the hearts is red, and I brushed a thin coat of iridescent Extreme Glitter over the hearts before I cut them out.  (And no glitter flaked off when I cut them!)  I added the phrase “Things I Love” with the sticker letters from the Blush collection.  I considered adding some Prima flowers to the top of the tin because it looks a little plain to me, but my 12-year-old son told me it looked good the way it was.  I may just go back and add some anyway.  😉

Here’s another photo that shows the side of the tin better, so you can see how the colors of the papers really do coordinate.  (Did I mention that I had a bad photography day when I was working on these projects?)

Thanks for looking at my projects today!  If you have any questions about them, feel welcome to ask in a comment!


In the spirit of full disclosure, the images used on today’s projects were provided to me by InStyle Stamps to aid in promoting their products.

Oct 012010

Last night I decided to try making something completely different for today’s post. I bought a Martha Stewart Scoring Board not too long ago. I’ve been using it some for making the score lines for my cards, but hadn’t done anything else with it. Last night I looked through the project idea booklet that came with it and decided to try making a gift box.

The directions in the booklet were really easy to follow, except for one thing. The booklet said to “cut slits on all four sides” but the way I pictured that, that would completely cut out the corner pieces so there wouldn’t be anything to form the corners of the box. Going by the sketches in the booklet, I felt that the directions should have said “cut slits on all four corners”. Anyway, I figured it out. Another thing that helped make this project go so quickly and easily was that the paper I chose was already the 8″ x 8″ size suggested in the directions.

The finished size of the box is 4″ square by 2″ tall. I think it would be pretty simple to make boxes of other sizes by adjusting the paper size and scoring lines.

Oh, one modification I did was to cut down the lid of the box so that some of the box bottom would show. I scored the 8″ x 8″ paper for the lid as per the directions, then cut it down to about 6.5″ square before cutting the corners and assembling it.

As a finishing touch, I added a ribbon bow and a tag. And here it is. Sorry the photo is so dark.

Supplies:
Stamps: Le Jardin, Treasured Trinkets (Lizzie Anne Designs)
Cardstock: French Floral Pretty Papers (LAD)
Ink: Old Olive (Stampin’ Up)
Other: Labels dies (Nestabilities); ivory ribbon (Sheer Creations)

Today’s post showcases a gift card holder that I made at stamp club a while ago.  It’s simply a 4.25″ square card with an extra insert to hold a credit card style gift card, like to a restaurant or a store or an iTunes card.  It was super easy to make.

Here’s the front of it.  The front is shorter than the back so that the pink cardstock shows below the punched edge when the card holder is closed.

jan-10-3-outside.jpg

Inside, I added a piece of pink cardstock that was punched with the same border punch as the front of the card. It doesn’t show in the photo, but the pink was attached with dimensional adhesive to accommodate the bulk of a gift card.  I chose to stamp a sentiment inside too.

jan-10-3-inside.jpg

See – I told you it was super easy!  🙂

Supplies: (All from Stampin’ Up)
Stamps: Wings of Friendship
Cardstock: Naturals White, Pretty in Pink
Ink: Pretty in Pink, Close to Cocoa, Certainly Celery
Other: eyelet border punch, Sweet Pea felt embellishment

Happy holidays, everyone!

Comments Off on Happy holidays, everyone!
Dec 242008

Whether you celebrate Christmas, Hanukkah, the solstice, Kwanzaa, or something else, I hope you have a very wonderful holiday season filled with all the things that make you happy.

If you’re in a creative mood, you should check out the Splitcoaststampers Holiday Challenge Extravaganza. A new challenge is being posted every day from December 20 through January 3.  So have some fun and get those creative juices flowing!

hce01-hce02.jpg

I combined the first two Holiday Challenges for this gift card holder.  I scored a piece of 4.25″ x 11″ cardstock along the 11″ side at 4.25″ and 9″, which allowed me to fold the cardstock into a 4.25″ square card with a 2″ deep pocket inside to hold the gift card.  You know how when you use dimensional adhesive, there’s usually a thin border strip of adhesive left over from the way they are cut and packaged? I used a thin strip of that to adhere the pocket, to accommodate the thickness of the gift card.

I hope my niece likes this as much as we love her! 

Stamps: Riveting (Stampin’ Up!)
Cardstock: Blue Bayou textured, Soft Sky, Chocolate Chip, Spring Showers designer paper (Stampin’ Up!); Jack Frost (Basic Grey)
Ink: Chocolate Chip
Other: sponge, Cuttlebug “Harmony” alphabet for scalloped circle, corner rounder punch (for straight scalloped border), Soft Sky ribbon, pearl brad, 1/2″ circle punch

© 2019 Suffusion theme by Sayontan Sinha